
Want to take screenshots on your MacBook like a pro? Look no further! Our step-by-step guide will show you how to capture screenshots in no time.
If you are into a job that needs you to take screenshots pretty often on your MacBook, you need to know about certain commands and shortcuts that can help you navigate through the hassle. Screenshots are generally a great way to share your work progress or capture an important breakthrough that you want to record a snapshot of. While you might have used this feature more on your smartphones, if you are using it on your MacBook, the process can be a little tricky to start with.
Aside from the use of the keyboard shortcuts and touch bar, there is also an in-built tool that helps you navigate through the same and help you get the fastest screenshot without any hassle.
Here, we are going to walk you through all the best ways you can capture a screenshot on MacBook.
Keyboard shortcuts
As mentioned, keyboard shortcuts are the OG method of taking a screenshot. It has been around for quite some time now and enables you to either capture a full screen, capture a single window, or part of the screen as necessary.
Some of the most important ones include:
· Command-Shift-3
The first and likely the most common way to take a screenshot of the whole screen is by pressing Command Shift 3, altogether. This helps you take a snapshot of the entire screen in a second.
· Shift-Command-4
This specific keyboard shortcut helps in selecting and cropping part of the screen that you want to capture. It converts your cursor into a crosshair, helping you navigate around the screen and select part of the screen that you would like to capture.
Once you are done turning your cursor into a crosshair initially, the next thing you need to do is select the type of screenshot you need to get. Here’s what you can do.
Press and release the space bar – if you want to screenshot the progress in a specific window, you can do this after pressing the initial shift-command-4. It converts the crosshair into a camera and then captures the progress in a specific window with a white border.
Press and hold the space bar – this is ideal if you don’t want to capture the entire individual screen but want to capture a part of it. You can seamlessly press and hold the space bar and engage in a separate selection area that you can reposition according to your needs. Holding down the space bar helps with the repositioning.
· Shift-Command-5
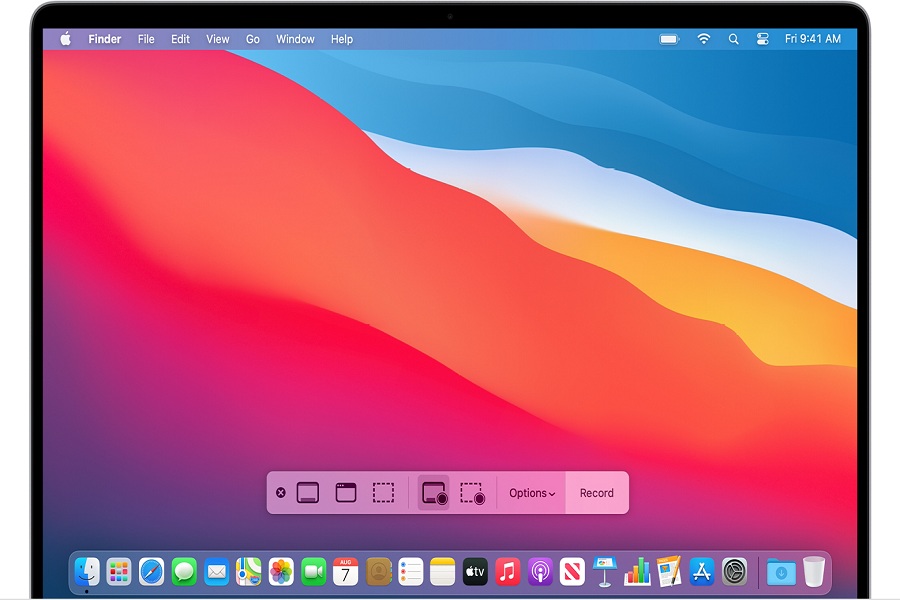
If you have the newer version of Mac, especially the MacOS Mojave (2018) variant, this command comes in handy to help you take a screenshot of the screen you are currently working on. It comes up as a combination of panels on the bottom of the screen with different capture options that you can choose from.
Amidst all these capture options, you have three different screenshot options that you can work with. One allows you to capture the entire screen, one works with a specific window and another one lets you capture a selected part of the screen.
This also enables you to get a peep into the preview thumbnail of the screenshot that you just captured. The Show Floating Thumbnail is what helps you out with the same. You will be able to view it on the lower right corner of the screen and check whether the screenshot is an ideal one or you need to capture it again. You can download iOS 14 emoji on Android as well to get iPhone feel.
How to capture a screenshot of your touch bar?
If you have the latest model of the MacBook with the touch bar, especially the 16” variant, you can easily capture a screenshot of what’s going on in your touch bar at the moment.
All you have to do is click on Command-Shift-6 to take an elongated screenshot of the touch bar easily without any hassle.
How to use the in-built Screenshot tool to capture screenshots on Mac?
Screenshot tools in Mac have been around for quite some time now but with the latest upgrades to MacBooks, more and more features are now added to the device and an in-built screenshot tool is one of them. If you love playing kid games, you can enjoy games at ggkids platform.
Here’s how you can open and use it on your MacBook. Just follow the steps as mentioned:
- Start by opening the launchpad, go to the other, and then go select the screenshot option. A keyboard shortcut to launch the screenshot tool is Shift+Command+5
- Doing this can enable you to take a screenshot of the entire screen, a portion of the screen, or a custom section of the screen
- Once you have the screenshot tool opened, you can seamlessly follow the above keyboard shortcuts to then take the screenshot accordingly
How to change where your screenshots are captured?
When you take a screenshot, chances are that it will be stored and saved in the general storage directly on your device. But, if you want to have a separate folder for your screenshots that is easily accessible, you can change the storage location of the screenshot easily.
- Once you open the screenshot tool, navigate down to the Settings and select the “Save to” option from there
- You can then change the storage location for the screenshots from the default location by clicking on “Other Locations” to change the destination location for saving the file
How to change the image format of the screenshot?
Once you have captured a screenshot on your MacBook, 9/10 chances are that the images will be saved as PNG files. But these are hefty files and consume a lot of space. If you don’t want your storage to be filled easily, there are some easy ways to change the image format to ensure that.
Switching to JPG format is easy but you will have to do a little bit of coding. Don’t worry though, we have sorted you out with the command too. Follow the steps as mentioned:
- Go to the launchpad, then other and “Terminal”
- Once the new window opens, type in defaults writes com. apple.screencapture type jpg
- Once done, enter your password and then restart your computer
- Following doing that, the screenshots should save in the preferred format that you have likely selected
Are there third-party options to capture screenshots?
Yes, several third-party applications can help you with screenshots on Mac, especially if you have an older version of the same. But we’d suggest that you look into the built-in options and keyboard shortcuts first before you think about downloading or installing a third-party application. You can go to jcpenney credit card login to get all the benefit of the credit card.
Some of the best third-party screenshot applications that you can consider are:
- Snaggit
- Skitch
- LightShot
- Snappy
- Grab
If you have been struggling to take screenshots on your MacBook, we hope this gives you all the details you likely need to know about the processes involve. Just ensure that you find the option that works the best for your version of Mac and then move ahead with the same.