

The iPad is a fantastic tool for displaying and enjoying your favorite photos, but it is popular for shooting them your iPhone is a lot more convenient and also a DSLR camera more competent. So how can you get off the snaps these apparatus and on to your own tablet?
In this guide we take a look at the top ways to transfer pictures directly from an iPhone or other apparatus to an iPad, in addition to tips on sharing photographs through iCloud. For related information, browse How to move photos from iPhone into Mac and The best way to talk about your Mac’s photographs via iCloud.
Wired transfer
The 2018 iPad Pro versions possess USB-C (instead of quad core) connectors, making things a whole lot simpler when transferring pictures from a camera.
Locate an proper cable (the exact cable you want will depend on your camera vents ) and plug in the camera into the iPad. Open Photos, and you’re going to notice a new tab tagged Import. From here you are able to easily get the pictures on the camera storage, and replicate across those that you fancy. The identical process may be used to plug in an SD card and get pictures off that.
For those who have elderly iPads, you can find a camera Lightning connector, even though the transfer will not be quite as quickly.
AirDrop
AirDrop out of an iPhone or even iPad:
Assuming you do not need to become involved with wires, the easiest method of moving a few photos is to utilize AirDrop. Follow steps given below:
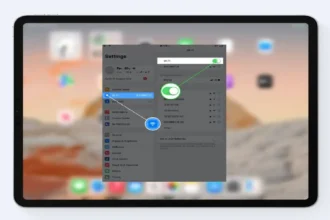
- Make certain your iPad is set to get over AirDrop. Open Settings > General > AirDrop and choose either’Contacts Just’ (if the sender is on your contacts book) or’Everybody’. You will also require both apparatus to get Bluetooth and Wi-Fi on (and be within range) and turn off any hotspots.
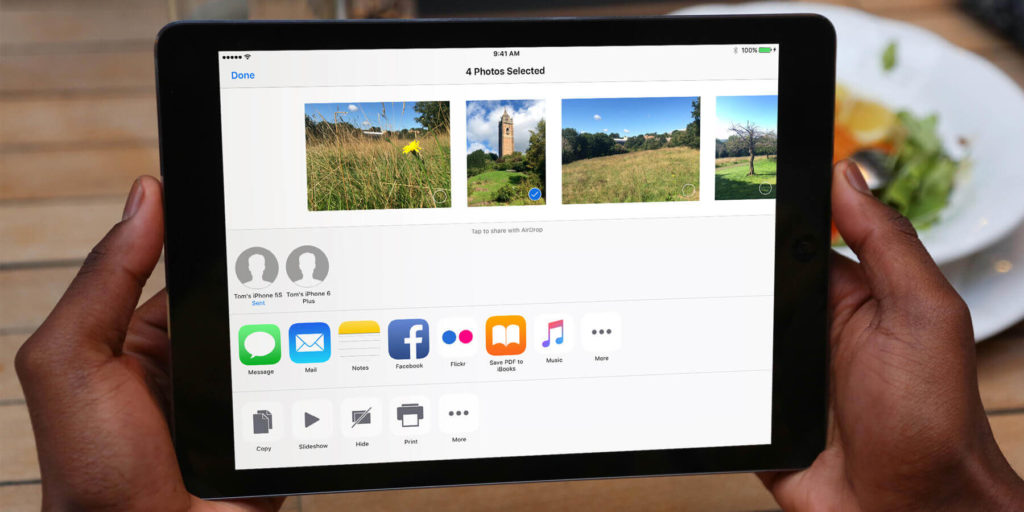
- Open Pictures on the sending apparatus. If you are only sending a single photograph, find and tap it, then tap on the sharing icon a square with an arrow pointing up, in the bottom left iPhone or shirt right on iPad. If you wish to send over one, then hit Select, tick numerous pictures, then hit on the sharing icon.
- You will now find the picture (s) to ship on peak of the display, and assorted sharing choices below. Tap the icon to the receiving apparatus in the AirDrop segment and, hey presto, the photograph (s) will be transmitted.
Also Read: Apple is going to launch Smart Battery Case for newly released iPhones
Since the launching of Yosemite back in 2014, macOS was in a position to AirDrop to and out of iOS. Here is how the Procedure works when you are moving from a Mac:
- As previously, check that both devices have Bluetooth and AirDrop switched and so are close together, and be certain that the iPad is set to get from contacts or everybody.
- Right-click a photograph on the macOS background (or inside a folder), then pick Chat > AirDrop. An icon to your goal iPad will look. Click this, and the photograph will be routed.
- Instead, open a Finder window and then click on AirDrop from the lefthand bar. You can now drag-and-drop a document to the icon to the goal iPad, and it’s going to be sent. It is possible to select numerous photographs and ship them in this manner.
Photo Stream
Photo Stream is a part of Apple’s iCloud support and is a very simple method of sharing photographs across all of your Apple devices.
- On Mac, click System Preferences > iCloud. Ensure there is a tick alongside Photos, then click Options and ensure that there’s a different tick next to’My Photo Stream’. Click on Done.
- About iPhone or iPad, go to Settings > Pictures and turn ‘Upload to My Photo Stream’ (or simply’My Photo Stream’).
- Open Pictures on the iPad, and then tap Albums, then My Photo Stream. Each of the pictures you have lately recorded on the connected iPhone, or additional to the Photos library onto your Mac, need to look in here.
Also Read: Apple releases ‘Real Stories’ video series featuring users saved by Apple Watch
iTunes sync
A fantastic way to move a high number of photographs from the Mac (or even a camera, which you need to link to the Mac) is by simply syncing them with iTunes and Photos. Follow the following steps:
- If your photographs have been on a camera or iPhone, plug your device in your Mac. If you are moving direct from the Mac itself, jump to step 4.
- Open Pictures in your Mac, and click on the title of the apparatus (below the section known as, er, Devices) from the lefthand bar. We would recommend clicking the ‘Publish To’ dropdown menu and choosing New Album, which means that your new pictures are all grouped together. Then either click Publish All New Things (top ), or tick the pictures you desire and click Publish Selected.
- Unplug the system that had the pictures on.
- Plug from the iPad with the Lightning or USB-C cable, and open iTunes. Click the iPad icon at the top bar to find the apparatus’s summary page.
- From the lefthand bar, pick Photos, and put a tick alongside Sync Photos. Next to’Copy photographs from’, pick Photos, then select either all of the photographs on the Mac or pick a record.
Click Done, then Apply.