

The quality that the iPhone camera gives is the best. I know many of my friends who are using iPhones just for their camera quality. And obviously, who doesn’t like to capture special moments when the outcome of photos is so good? Your iPhone camera can help you capture these fleeting moments, whether they involve a stunning sunset, a mouth-watering meal, or a gathering of friends. But have you thought about the times that take place after the sun sets? Do you find it difficult to take quality pictures in dim lighting? It is completely fine if that happens. Since the iPhone camera’s night mode is here to assist, you don’t need the blurry photos anymore taken at night.
What is Night Mode on iPhone?
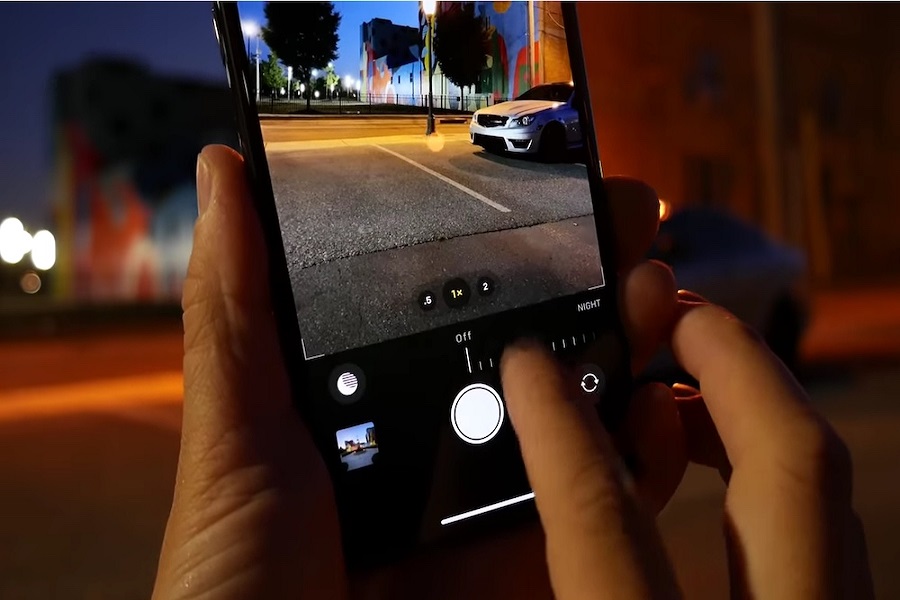
Thanks to the iPhone camera’s night mode function, you can capture better images in low light. In order to capture more light and detail in your images, you need the night mode on your iPhone which combines technology and software. When you choose night mode to optimize your images for low light conditions, your iPhone camera will automatically change the exposure duration, ISO, and other settings.
How to turn on Night Mode on the iPhone
Turning on night mode on the iPhone is easy. Here are the steps to follow:
- Open the Camera app on your iPhone.
- On the camera screen, swipe left until “Night” mode appears. (The icon for this setting looks like a crescent moon.)
- Set up your shot and click the shutter.
- That’s it, you are done!
To optimize your shot for low light conditions, use the night mode, which will automatically modify the exposure duration, ISO, and other parameters.
Tips for using Night Mode
While night mode is a powerful tool for capturing better photos in low light situations, there are a few things you can do to make the most of it:
- Keep your iPhone steady: When you’re taking photos in low light situations, it’s important to keep your iPhone as still as possible. This will help prevent blur in your photos and ensure that they come out sharp and clear.
- Use a tripod or stabilizer: If you’re planning on taking photos in low light situations frequently, consider investing in a tripod or stabilizer for your iPhone. This will help you keep your iPhone steady and prevent blur in your photos.
- Experiment with different angles: Night mode can be a great opportunity to experiment with different angles and perspectives. Try taking photos from different heights and angles to see what works best for your subject.
- Use the timer: If you’re struggling to keep your iPhone steady while taking a photo, try using the timer feature. This will give you a few seconds to steady your iPhone before the photo is taken.
- Be patient: Night mode may take a few seconds to capture your photo, so be patient and give it time to work its magic. The end result will be worth the wait!
Conclusion
A key tool for taking better pictures in dim lighting is night mode. Using these pointers and techniques, you may get the most out of this function and take gorgeous pictures you’ll want to show off to your loved ones. Turn on night mode the next time you’re out at night and want to take a photo to let your iPhone take care of the rest!
Until next time, with another topic. Till then, Toodles.